Deploying your Python apps using Dokku and DigitalOcean
During the February 2010 Python Meetup in Cluj, I gave this talk about how to deploy your very own PaaS on a Digital Ocean droplet using Dokku. Below is a summary of the talk with some extras sprinkled here and there.
So what is Dokku? The short answer could very well be: A Docker powered "poor mans" mini Heroku bash script. The longer version, as described on DigitalOcean's site, would be:
Dokku is a Platform as a Service solution that enables users to deploy and configure an application to a production environment on a separate server. It uses Docker, a Linux container system, to manage its deployments, and allows users to deploy to a remote server.
All this fancy talk means that Dokku automates any the Docker containers (on a single server) you may need in order to make your applications available to the world. By default Dokku uses the herokuish docker image (which emulates Heroku build and runtime tasks) and configures a Nginx container to take care of serving the right content for the right virtual host or port. By allowing Dokku to take over these configuration tasks you are just one git push dokku master away from deploying your app to the server.
Of course, there is more to an application than just the containers that run the app and the web server. Dokku takes care of that using a wide offering of plugins that let you customize your setup anyway you like. You want a database just dokku plugin:install https://github.com/dokku/dokku-postgres.git postgres, you need caching capabilities dokku plugin:install https://github.com/dokku/dokku-memcached.git memcached, etc. This gives you a ton of flexibility in regards of the tech stack that you want on that server.
There are many more things Dokku can do, like 0-downtime deployment, process scaling, database backups, Docker file/image deployments, etc., but let's cut the chit-chat and see this thing in action.

First we want to create a new droplet using the One-click apps and choosing Dokku on 18.04, or click this shortcut to autocomplete most of the options you need. NOTE: while the smallest 1GB instance should be enough to get you started, I recommend going with the at least a 2GB droplet later on.
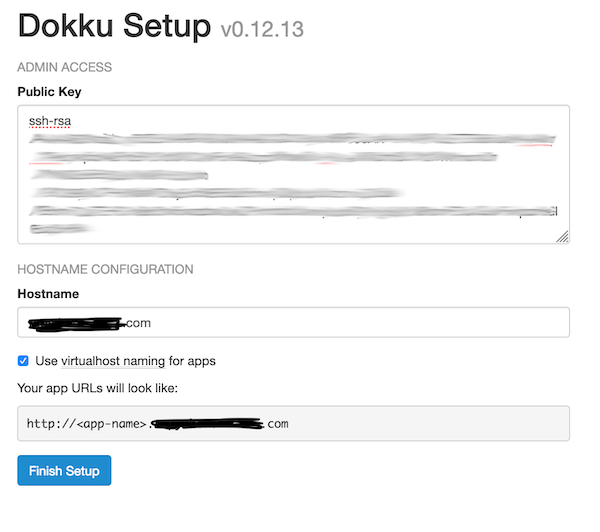
After the droplet creation, head over to the DNS management of the domain you want to use and add a A DNS record to point a (sub)domain to your new droplet IP address (ex. dokku.yourdomain.com. IN A 123.45.67.89). Access the domain in a browser and you should be presented with the initial setup, as seen below:

Now that we finished provisioning the instance (make sure you pressed Finish setup in the last step), let's connect to the server and do some additional updates:
# On the Dokku host
# update the dokku repo keys as they are outdated on the one-click apps
$ wget -qO - https://packagecloud.io/dokku/dokku/gpgkey | sudo apt-key add -
$ sudo apt-get update
$ sudo apt-get upgrade
# do additional setup you might need (install fail2ban, configure ufw, etc.)
As mentioned earlier, we can install plugins in order to enhance our glorious PaaS, so PostgreSQL and Let's Encrypt Dokku plugins are usually a good start:
# On the Dokku host
$ sudo dokku plugin:install https://github.com/dokku/dokku-postgres.git
$ sudo dokku plugin:install https://github.com/dokku/dokku-letsencrypt.git
$ dokku plugin
In order to test our setup we need to create our first app where we will deploy our project and a database for the app to use:
# On the Dokku host
$ dokku apps:create helloworld
# creating the database container
$ dokku postgres:create helloworld-db
# link the database to the app
$ dokku postgres:link helloworld-db helloworld
# check the postgres plugin set the app environment config values for the database connection
$ dokku config helloworld
# check that the app subdomain vhost was created and assigned to the app
$ dokku domains:report
On your local machine create a project directory and install Django in a virtual environment, then:
# On your local machine
# this will create a new Django project based on a Heroku open-source template
$ django-admin startproject --template=https://github.com/heroku/heroku-django-template/archive/master.zip --name=Procfile helloworld
$ git init
$ git add -A
$ git commit -m "Initial commit"
In order to deploy the above project we have to add a git remote pointing to the Dokku instance:
# On your local machine
# the user must be `dokku` otherwise it won't work. Also, the string after `:` must be the name of the Dokku app created earlier
$ git remote add dokku [email protected]:helloworld
# deploy the app
$ git push dokku master
You will be able to witness all the deployment steps printed on the console, in the style of a Heroku deployment. If the deployment finished successfully, it will also show you the URLs where you can access the app you just deployed. In the above case it should be http://helloworld.dokku.yourdomain.com/.
As a final step, we can get the project to be served over HTTPS using a Let's Encrypt certificate:
# On the Dokku host
# we set the email where to get notifications from the certificate authority
$ dokku config:set --global DOKKU_LETSENCRYPT_EMAIL=[email protected]
# we get issued a certificate with one command
$ dokku letsencrypt helloworld
# and we make sure it gets renewed automatically
$ dokku letsencrypt:cron-job --add
You should be able to access the project at https://helloworld.dokku.yourdomain.com/. There are a few more things that you can do at this point, like setting up a redirect from http to https using dokku-redirect, but I will stop here for now.
If you want to find out more about Dokku please check out their great documentation over at http://dokku.viewdocs.io/dokku/ and the quite extensive list of plugins they currently support http://dokku.viewdocs.io/dokku/community/plugins/.